

Cloudflare Setup Tutorial: Secure Your Website in 5 Steps
Last updated: 20 June 2026
When you’re running a WordPress website, securing it properly is crucial. That’s where Cloudflare comes in. In this Cloudflare setup tutorial, I’ll walk you through how to securely set up Cloudflare for your WordPress site. Whether you’re a business owner or a developer, this guide will help you understand how to protect your website using Cloudflare’s powerful tools. You’ll learn how to add your domain, import DNS records, update name servers, and configure SSL certificates. By the end of this tutorial, your website will be protected and encrypted using Cloudflare’s infrastructure.
Quick Answer
To set up Cloudflare for your WordPress website, you need to add your domain, import DNS records, select a plan, update name servers, and configure SSL settings. This process ensures your site is protected and encrypted using Cloudflare’s infrastructure.
Step 1: Adding Domain to Cloudflare and Selecting the Plan
Let’s start by logging into the Cloudflare dashboard. Once you’re in, you’ll see a screen that allows you to add a new domain.
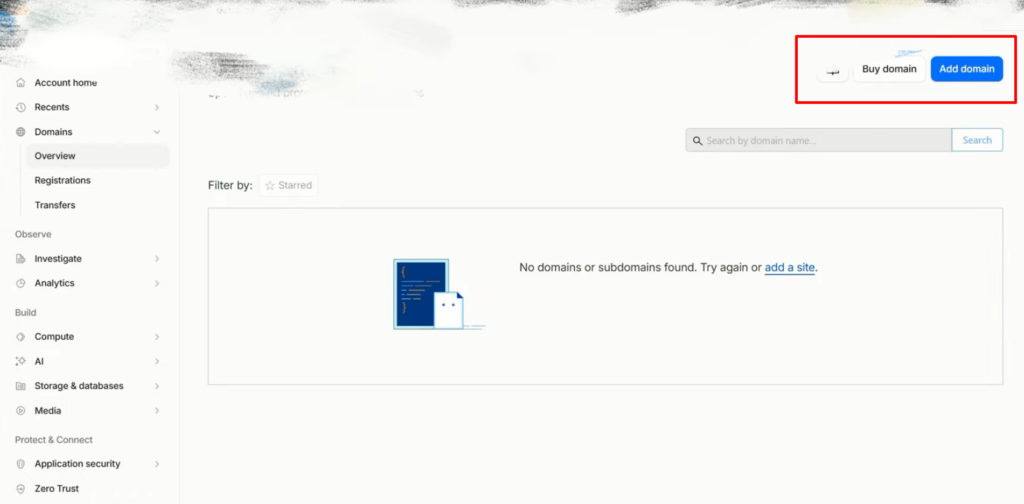
I’m going to click on the option to add a domain. I’ll paste in the domain name that I want to manage through Cloudflare. In your case, you’ll use your own domain.
For example, when adding a domain, Cloudflare shows a list of DNS records from your current host. You can see A records, MX records, and CNAMEs that are already set up.
I recommend leaving this setting as is. It will pull in all the DNS records from your current hosting provider. This includes email DNS records if you’re using email services. This is a helpful feature because it ensures that your existing email services continue to work without interruption.
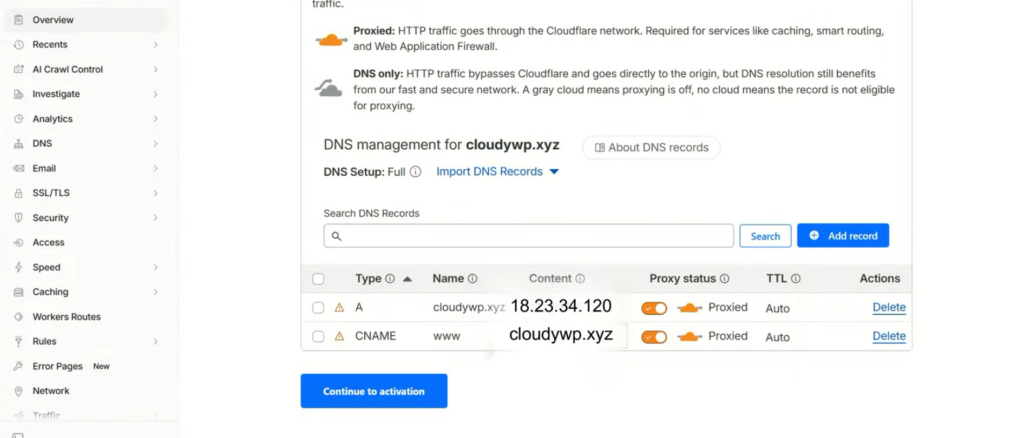
When you click continue, you’ll see a screen that shows your DNS records. If everything imported correctly, you’ll see the IP address and your domain name. Cloudflare has already set up the necessary records for you. If you were setting up manually, you’d need to add the IP address of your hosting provider. But since we’re importing, you don’t have to do that. This is a great time-saver.
Pro Tip: If you’re working with an existing domain that already has email services, be careful about DNS records. You must ensure that email-related DNS records are correctly imported to avoid service disruptions.
You’ll be asked to select a plan. For this tutorial, I’ll go with the free Cloudflare plan. It’s sufficient for most users and provides a good starting point for website security.
Once you select the plan, you’ll be taken to a screen where you can review your DNS records. This is where you confirm that everything has been imported correctly. You’ll see the IP address and your domain name. Cloudflare has automatically configured these for you, so you don’t need to make any changes.
Step 2: Updating Name Servers to Point to Cloudflare
Now that the DNS records are imported, I’ll click on the “continue to activation” button. This is the crucial step where you update your name servers to point to Cloudflare. This is the part where Cloudflare takes over DNS management for your domain.
For example, in Hostinger’s control panel, you go to the DNS settings and replace the name servers with the two Cloudflare servers shown in the Cloudflare dashboard.
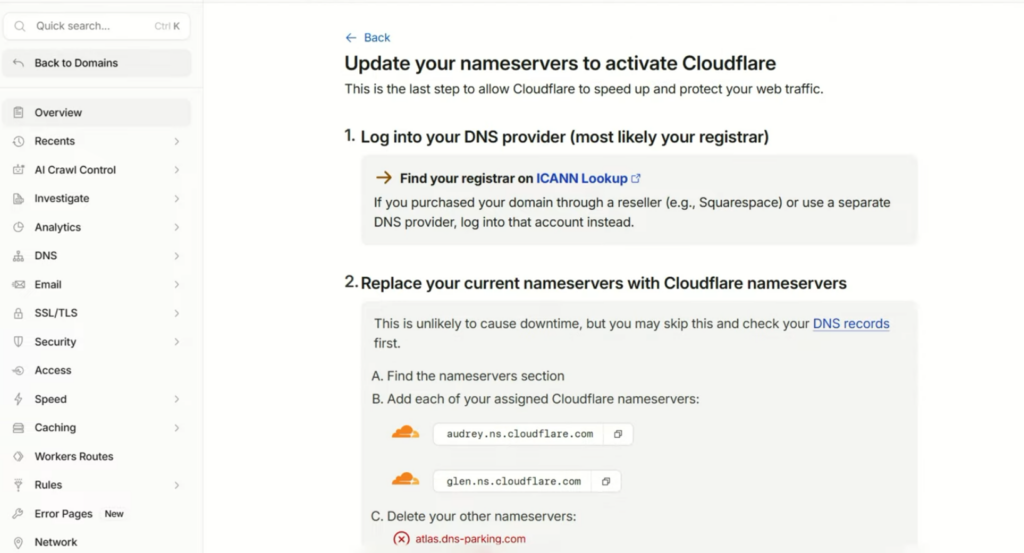
Cloudflare provides a list of name servers that you need to update in your domain provider’s control panel. In my case, I’m using Hostinger as my hosting provider. I’ll go to the Hostinger control panel and look for the DNS and name servers section. There, I’ll find the option to change name servers.
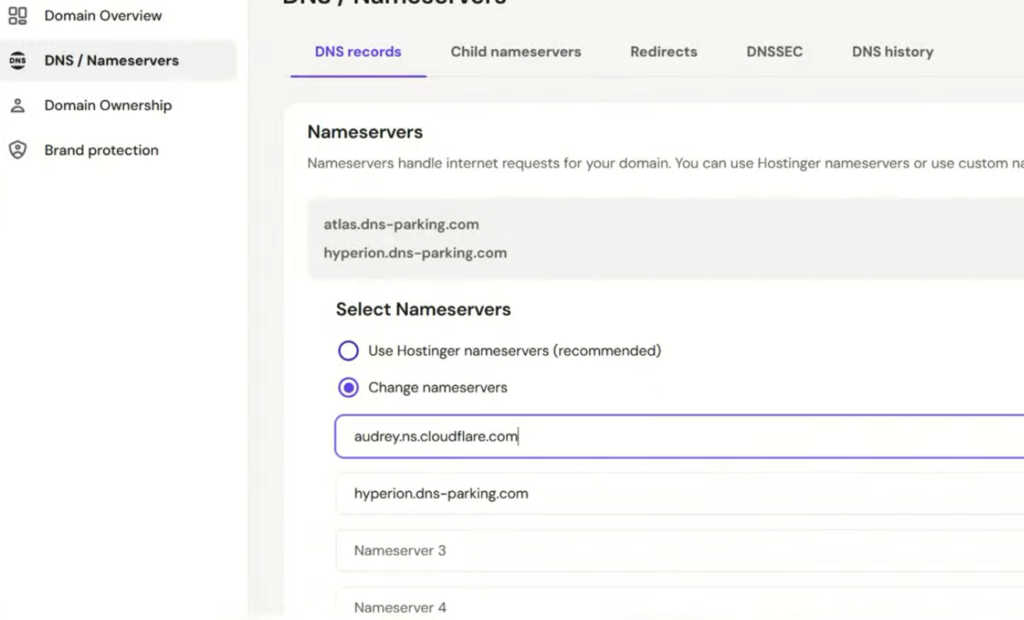
I won’t touch the child name server settings. I’ll simply update the name servers by pasting in the two Cloudflare name servers provided. Once I’ve entered them, I’ll save the changes. It’s important to note that name server changes can take up to 24 hours to propagate across the internet.
After updating the name servers, I’ll verify the changes using a DNS lookup tool. I’ll go to dnschecker.org and enter my domain name. This tool shows you which name servers are currently active for your domain. You’ll need to wait until the Cloudflare name servers appear in the results before your site is fully managed by Cloudflare.
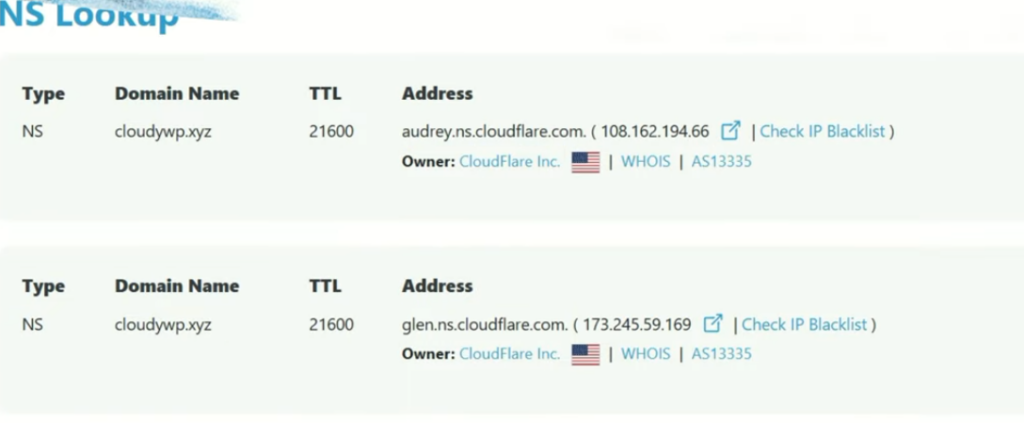
Pro Tip: The DNS lookup tool can help you verify when changes are complete.
Step 3: Configuring SSL Certificate and Enabling HTTPS
Once I’ve updated the name servers, I’ll check the DNS propagation. I’ll go to dnschecker.org again and enter my domain name. It will show the current name servers. You’ll see that the Cloudflare name servers are now active. This means your domain is now protected by Cloudflare.
After confirming the DNS changes, I’ll go back to the Cloudflare dashboard. I’ll navigate to the SSL overview section. Here, I’ll see that the SSL certificate is installed and working. The certificate is set to secure the connection from the browser to Cloudflare and then to your server.
When I refresh the site, I notice that it’s currently broken. This happens because the internal server settings need to match Cloudflare’s SSL configuration. In my case, I need to adjust the SSL encryption mode. I’ll go to the SSL settings and switch from “Full” to “Flexible” encryption mode.
“Full” to “Flexible” encryption mode do this only if you know what you are doing, for most setups Full protection is better.
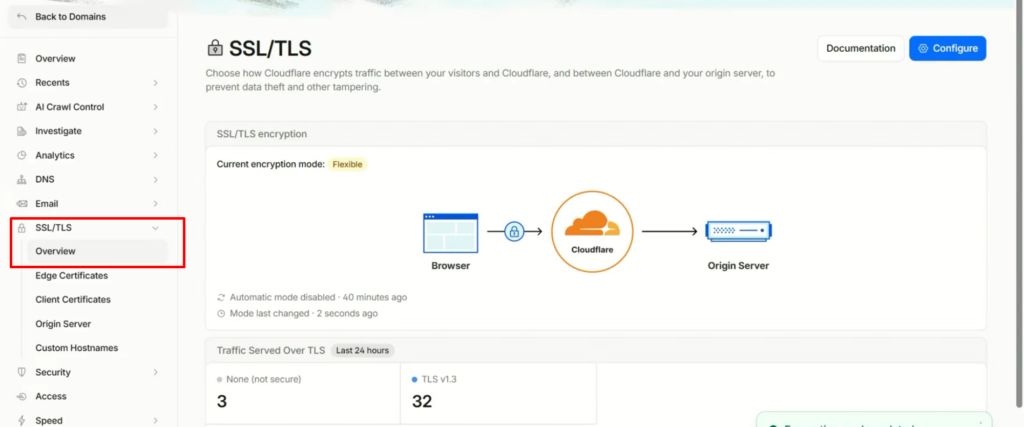
This enabling https on wordpress site using cloudflare. Once I save the setting and refresh the site, it will work correctly. You’ll notice that the connection is now secure and the certificate is working.
For additional security, I’ll go to the edge certificates section and enable “Always Use HTTPS“. This ensures that anyone trying to access your site via HTTP will be automatically redirected to HTTPS. This is a simple but effective way to secure your website.
Step 4: Securing Website with Cloudflare Firewall Rules
For example, I created a rule to challenge visitors from Australia. When I tested it in private browsing mode, a challenge page appeared automatically.
With the basic setup complete, I’ll now explore additional security features. I’ll go to the overview settings in Cloudflare. Here, I’ll see that Cloudflare provides default security tools. These include protection against DOS attacks and bot fight mode. These are enabled by default and provide a good baseline for website security.
Cloudflare also offers security rules that you can customize. In the free plan, you get five security rules that you can add. I’ll demonstrate how to create a rule to challenge visitors from specific countries. For example, I’ll create a rule that challenges visitors from Australia using a managed challenge.
If someone from Australia visits, they’ll get a challenge from Cloudflare. This helps block bad traffic. This helps protect against automated attacks while still allowing legitimate visitors to access the site.
After setting up the rule, I’ll test it using private browsing mode. This ensures that the rule is working correctly without affecting my regular browsing session. I’ll also check the security overview section to see analytics and monitor any security events.
Here is detailed guide to help you setup more Cloudflare security rules to secure your website.
Cloudflare’s analytics show how well your site is protected. You can see the number of threats blocked, the types of attacks detected, and other important metrics. This information helps you understand how effective your security measures are.
Step 5: Recommendations
After setting up your SSL certificate and implementing basic security rules, you’re well on your way to securing your website. But there are a few more steps you can take to make your site even more robust.
First, make sure to enable the “Always Use HTTPS” setting in the Edge Certificates section. This ensures that any visitor who tries to access your site via HTTP is automatically redirected to the HTTPS version. This is a simple but effective way to enforce secure connections.
Next, review your Cloudflare settings regularly. As your site grows, you might want to adjust security rules or add more protection. Cloudflare’s dashboard makes it easy to monitor and update these settings.
If you’re using WordPress, consider installing a plugin like Cloudflare for WordPress to integrate Cloudflare directly into your WordPress admin. This plugin allows you to manage Cloudflare settings directly from your WordPress dashboard, which can save you time and effort.
Also, keep an eye on your site’s performance. Cloudflare offers performance optimizations like caching and minification, which can significantly speed up your site. You can enable these features in the “Speed” section of your Cloudflare dashboard.
Finally, remember to keep your Cloudflare account updated with the latest security best practices. Cloudflare regularly updates its tools and features, so staying informed helps you protect your site better.
Pro Tip: Set up email notifications for your Cloudflare account so you’re alerted to any security events or changes in your site’s status. This way, you can respond quickly to any issues.
By following these steps, you’ll have a secure, optimized, and protected website. Cloudflare makes it easy to implement these security measures without needing advanced technical knowledge. If you’re running a WordPress site, this setup is a great foundation for long-term security and performance.
Finally, I like to check the Cloudflare dashboard’s overview to make sure everything is working as expected. The overview provides a summary of your site’s performance, security, and analytics. It’s a good place to verify that your site is protected and that no issues have been detected. If you notice any unusual activity or errors, you can investigate further using the detailed logs and analytics available in the dashboard.
Conclusion
Remember that Cloudflare’s security features go beyond basic SSL encryption. You can set up firewall rules, challenge suspicious visitors, and monitor security analytics. These additional features provide a robust defense against various online threats.
Whether you’re a business owner or a developer, implementing Cloudflare is a smart investment in your website’s security. The free plan provides excellent protection for most users, and you can always upgrade to a paid plan if you need more advanced features.
By following this tutorial, you’ve learned how to secure your website using Cloudflare’s powerful tools. Your site is now protected, encrypted, and ready to handle traffic safely. If you have any questions or need further assistance, feel free to explore Cloudflare’s documentation or reach out to their support team.
For more tutorials on WordPress security and optimization, check out other security guides on CloudyWP. You can also explore how to optimize your WordPress site for SEO to improve your online visibility.
Frequently Asked Questions
Can’t find what you need? Contact our team →
Need help with this for your Melbourne business?
CloudyWP builds WordPress, Shopify and custom websites for Australian SMBs.
Be the first to comment