

WordPress site on Kubernetes with Cloudflare with MySQL database and Redis cache updated
A continuation of the WordPress on Kubernetes deployment guide. This post covers configuring a real domain through Cloudflare, fixing the WordPress redirect loop caused by Traefik’s forwarded headers, enabling Redis Object Cache for measurable performance gains, and a complete debugging toolkit for every layer of the stack.
In the previous post, WordPress was deployed on a single-node k3s cluster with MySQL and Redis pods, accessible only through a placeholder nip.io hostname. This follow-up takes the deployment from internally-accessible to publicly available at a real domain with HTTPS, then demonstrates Redis Object Cache delivering a measurable performance improvement.
Along the way, this post covers two issues that commonly surface when running WordPress behind a CDN: a redirect loop in the admin area, and a subtle Traefik default that silently overrides forwarded headers. Both have clean fixes once the underlying mechanics are understood.
Table of Contents
- The target architecture
- Step 1: Configure the domain in Cloudflare
- Step 2: Route traffic into the cluster
- Step 3: Update the Traefik ingress for the real domain
- Step 4: Update WordPress URLs in the database
- Step 5: Resolve the wp-admin redirect loop
- Step 6: Fix the Traefik forwarded headers default
- Step 7: Install and configure Redis Object Cache
- Step 8: Verify Redis caching is active
- Troubleshooting playbook
- Credentials and password recovery
- Frequently asked questions
- Conclusion
The target architecture
The complete request flow after this configuration:
Browser (https://example.com)
       ↓
Cloudflare (Flexible SSL — HTTPS to visitor, hides origin IP)
       ↓ HTTP
Server public IP (port 80)
       ↓
Traefik (k3s built-in ingress controller, listening on host port 80)
       ↓ matches Host: example.com
       ↓
WordPress Service (ClusterIP, namespace: wordpress)
       ↓
WordPress Pod (Apache + PHP 8.2)
       ├── MySQL Pod (persistent database)
       └── Redis Pod (object cache)
Three boundaries, each with a clear responsibility:
- Cloudflare terminates HTTPS at the edge, provides DDoS protection, and conceals the origin IP from public DNS.
- Traefik ships with k3s by default. It listens on host ports 80 and 443, reads the HTTP
Hostheader, and routes to the appropriate Kubernetes service. - Kubernetes Services handle internal routing and load balancing between pods.
This is the minimum viable architecture for running WordPress on Kubernetes behind a CDN. No additional reverse proxy is required — Traefik handles everything inside the cluster.
Step 1: Configure the domain in Cloudflare
Cloudflare provides free DNS, SSL, and DDoS protection, which makes it the simplest way to put a Kubernetes deployment behind a global CDN. The setup takes about ten minutes.
Add the domain
- Sign in to Cloudflare and click Add a Site.
- Enter the domain name (for example,
example.com). - Select the Free plan.
- Cloudflare scans existing DNS records — review them and continue.
- Cloudflare provides two nameservers. Update the domain’s nameservers at the registrar (GoDaddy, Namecheap, etc.) to these values.
- Wait for activation. This typically takes 5-30 minutes.
Add the A record
Once the domain is active in Cloudflare, navigate to DNS → Records and add an A record:
| Field | Value |
|---|---|
| Type | A |
| Name | @ (the root domain) |
| IPv4 address | The server’s public IP |
| Proxy status | 🟠 Proxied (orange cloud) |
| TTL | Auto |
To find the server’s public IP, run on the server:
curl ifconfig.me
The Proxied (orange cloud) status is essential. With it enabled:
- Cloudflare handles HTTPS automatically with its own certificate
- The server’s real IP is hidden from public DNS lookups
- DDoS protection and caching become active
- Cloudflare’s firewall and page rules become available
If a www subdomain is desired, add a CNAME record:
| Field | Value |
|---|---|
| Type | CNAME |
| Name | www |
| Target | example.com |
| Proxy status | 🟠 Proxied |
Configure SSL/TLS mode
Under SSL/TLS → Overview, set the encryption mode to Flexible:
- Browser ↔ Cloudflare: HTTPS, using Cloudflare’s SSL certificate
- Cloudflare ↔ origin server: HTTP
Flexible SSL is the simplest configuration when the origin server is not configured for HTTPS. It gets visitors a valid HTTPS connection immediately without requiring SSL certificate management on the server.
For stronger security, the next step is moving to Full or Full (strict) mode, which requires a valid certificate on the origin (via cert-manager or similar). That’s covered as a follow-up improvement at the end of this post.
Also enable Always Use HTTPS under SSL/TLS → Edge Certificates. This ensures any HTTP request is automatically upgraded to HTTPS.
Verify DNS propagation
From any machine, confirm DNS resolves to Cloudflare’s edge:
nslookup example.com
The response should show a Cloudflare IP (typically in the 104.x.x.x or 172.67.x.x ranges), not the actual origin IP. This confirms the proxy is active.
Step 2: Route traffic into the cluster
If the k3s server is hosted on a cloud provider with a public IP, no additional routing is needed — Cloudflare will reach the server directly on port 80.
If the server sits behind a router or firewall, port 80 (and optionally 443) needs to forward to the Kubernetes node:
| External Port | Internal IP | Internal Port |
|---|---|---|
| 80 | K3s node IP | 80 |
| 443 | K3s node IP | 443 |
If the server’s IP is dynamic (DHCP-assigned), set a static IP or DHCP reservation to prevent the port forwarding rule from breaking on reboot.
Open the firewall
On the k3s server, ensure ports 80 and 443 are open. If ufw is active:
sudo ufw allow 80/tcp
sudo ufw allow 443/tcp
sudo ufw reload
For cloud providers, update the instance’s security group or firewall rules to allow inbound HTTP/HTTPS — ideally restricted to Cloudflare’s IP ranges (documented here) for additional protection.
Step 3: Update the Traefik ingress for the real domain
The ingress created in Part 1 used a placeholder nip.io hostname. It needs to be updated to match the real domain so Traefik routes requests correctly when the Host header arrives.
Update wordpress-ingress.yaml:
apiVersion: networking.k8s.io/v1
kind: Ingress
metadata:
  name: wordpress-ingress
  namespace: wordpress
  annotations:
    traefik.ingress.kubernetes.io/router.entrypoints: web
spec:
  ingressClassName: traefik
  rules:
    - host: example.com
      http:
        paths:
          - path: /
            pathType: Prefix
            backend:
              service:
                name: wordpress
                port:
                  number: 80
    - host: www.example.com
      http:
        paths:
          - path: /
            pathType: Prefix
            backend:
              service:
                name: wordpress
                port:
                  number: 80
Apply it:
kubectl apply -f wordpress-ingress.yaml
Verify the ingress is registered:
kubectl get ingress
The output should show both hosts:
NAME                CLASS     HOSTS                          ADDRESS         PORTS   AGE
wordpress-ingress   traefik   example.com,www.example.com    <node-ip>       80      30s
Sanity check from the server
Before involving Cloudflare in the test, confirm the ingress works on the local network:
curl -I -H "Host: example.com" http://localhost
The expected response:
HTTP/1.1 200 OK
Content-Type: text/html; charset=UTF-8
Server: Apache/2.4.59 (Debian)
X-Powered-By: PHP/8.2.21
Link: <http://wordpress.X.X.X.X.nip.io/wp-json/>; rel="https://api.w.org/"
The Server: Apache header confirms Traefik forwarded the request to the WordPress pod successfully. The Link header still references the old nip.io URL — that’s stored in WordPress’s database and needs updating next.
Step 4: Update WordPress URLs in the database
WordPress stores its site URL in the wp_options table during installation. Every internal link, image reference, and REST API endpoint uses these values. They need to be updated to the new domain.
Connect to MySQL inside the pod:
kubectl exec -it deploy/mysql -- mysql -u wpuser -p wordpress
Enter the MySQL password (retrieved from the Kubernetes secret — see the credentials section if needed).
At the mysql> prompt:
-- Check current values
SELECT option_name, option_value
FROM wp_options
WHERE option_name IN ('siteurl', 'home');

-- Update to the new domain (HTTPS, since Cloudflare serves HTTPS to visitors)
UPDATE wp_options SET option_value = 'https://example.com' WHERE option_name = 'siteurl';
UPDATE wp_options SET option_value = 'https://example.com' WHERE option_name = 'home';

-- Verify the update
SELECT option_name, option_value
FROM wp_options
WHERE option_name IN ('siteurl', 'home');

EXIT;
After exiting MySQL, flush Redis (since cached responses may contain the old URLs) and restart the WordPress deployment to clear PHP’s OpCache:
kubectl exec deploy/redis -- redis-cli FLUSHALL
kubectl rollout restart deploy/wordpress
kubectl rollout status deploy/wordpress
For sites with existing content, post bodies and metadata may also contain hardcoded references to the old URL. WP-CLI handles this safely with serialized data:
kubectl exec -it deploy/wordpress -- bash
cd /var/www/html
curl -O https://raw.githubusercontent.com/wp-cli/builds/gh-pages/phar/wp-cli.phar
chmod +x wp-cli.phar

./wp-cli.phar search-replace 'http://old-domain.com' 'https://example.com' \
  --allow-root --skip-columns=guid

exit
The --skip-columns=guid flag is essential — GUIDs in WordPress look like URLs but are immutable identifiers that should never be modified.
Step 5: Resolve the wp-admin redirect loop
At this point, the homepage loads correctly at https://example.com, but attempting to access https://example.com/wp-admin produces a browser error: “This page isn’t redirecting properly” or “too many redirects”.
The cause is a mismatch between what the visitor sees and what WordPress sees:
1. Browser → https://example.com/wp-admin (HTTPS)
2. Cloudflare → origin server over HTTP (Flexible SSL mode)
3. Traefik → WordPress (all HTTP)
4. WordPress receives an HTTP request
5. WordPress checks the database: siteurl is "https://example.com"
6. WordPress's force_ssl_admin() function detects mismatch
7. WordPress returns 301 redirect to https://example.com/wp-admin
8. Browser follows the redirect → back to step 1 → infinite loop
The fix is to teach WordPress to recognize the X-Forwarded-Proto header that Cloudflare sends. This header indicates the original protocol (HTTPS) even though the connection to the origin uses HTTP.
The standard solution, recommended in WordPress’s official documentation for reverse-proxy setups, is to add a small snippet to wp-config.php that sets the $_SERVER['HTTPS'] variable when the forwarded header indicates HTTPS.
Add the trust snippet
Open a shell in the WordPress pod:
kubectl exec -it deploy/wordpress -- bash
cd /var/www/html

# Always back up wp-config.php before editing
cp wp-config.php wp-config.php.bak-$(date +%s)
The snippet must be inserted before the require_once ABSPATH . 'wp-settings.php'; line. If it runs after, WordPress’s HTTPS detection has already happened and the snippet has no effect.
Use sed to insert it at the correct location:
sed -i "/require_once ABSPATH . 'wp-settings.php';/i\\
\\
/* Trust reverse proxy for HTTPS detection */\\
if (isset(\$_SERVER['HTTP_X_FORWARDED_PROTO']) \&\& \$_SERVER['HTTP_X_FORWARDED_PROTO'] === 'https') {\\
    \$_SERVER['HTTPS'] = 'on';\\
}\\
" wp-config.php
Verify the snippet is in the right position:
grep -n "X_FORWARDED\|wp-settings" wp-config.php
The output should show the X_FORWARDED line at a lower line number than wp-settings:
126:if (isset($_SERVER['HTTP_X_FORWARDED_PROTO']) && ...
130:require_once ABSPATH . 'wp-settings.php';
Verify PHP syntax is still valid:
php -l wp-config.php
Expected: No syntax errors detected in wp-config.php
Exit the pod and restart WordPress:
exit

kubectl rollout restart deploy/wordpress
kubectl rollout status deploy/wordpress
kubectl exec deploy/redis -- redis-cli FLUSHALL
Test in an incognito window
Browsers cache 301 redirects aggressively. Test the fix in a fresh incognito or private browsing window to bypass any cached redirect chain.
https://example.com/wp-admin
The WordPress login page should now load cleanly. If it still redirects, continue to Step 6 — Traefik’s default behavior may be silently overriding the header before it reaches WordPress.
Step 6: Fix the Traefik forwarded headers default
If the wp-admin redirect loop persists even after adding the wp-config.php snippet, the cause is almost certainly Traefik’s default header handling.
By default, Traefik does not trust X-Forwarded-* headers from upstream sources — it overwrites them with its own values to prevent header spoofing. Since Traefik itself receives HTTP traffic (Cloudflare forwards over HTTP in Flexible mode), it overwrites X-Forwarded-Proto with http. WordPress never sees the original HTTPS signal.
Diagnose with a test endpoint
A short PHP script reveals exactly what WordPress receives:
kubectl exec deploy/wordpress -- bash -c 'cat > /var/www/html/_test.php << "EOF"
<?php
require_once DIR . "/wp-load.php";
echo "X-Forwarded-Proto: " . ($_SERVER["HTTP_X_FORWARDED_PROTO"] ?? "MISSING") . "\n";
echo "HTTPS variable: " . ($_SERVER["HTTPS"] ?? "NOT SET") . "\n";
echo "is_ssl(): " . (is_ssl() ? "TRUE" : "FALSE") . "\n";
echo "siteurl: " . get_option("siteurl") . "\n";
EOF'
Call it through Traefik, simulating Cloudflare:
curl -s -H "Host: example.com" -H "X-Forwarded-Proto: https" \
  http://<node-ip>/_test.php
If Traefik is overwriting the header, the output looks like:
X-Forwarded-Proto: http        ← overwritten by Traefik
HTTPS variable: NOT SET
is_ssl(): FALSE
siteurl: https://example.com   ← mismatch causes the loop
Configure Traefik to trust forwarded headers
k3s deploys Traefik using a HelmChart. The proper way to customize it is by creating a HelmChartConfig that k3s automatically reconciles:
sudo nano /var/lib/rancher/k3s/server/manifests/traefik-config.yaml
Add this content:
apiVersion: helm.cattle.io/v1
kind: HelmChartConfig
metadata:
  name: traefik
  namespace: kube-system
spec:
  valuesContent: |-
    additionalArguments:
      - "--entrypoints.web.forwardedHeaders.insecure=true"
      - "--entrypoints.websecure.forwardedHeaders.insecure=true"
The --forwardedHeaders.insecure=true flag instructs Traefik to trust upstream X-Forwarded-* headers without verification.
Security consideration: This setting is appropriate when Traefik sits behind a trusted CDN (like Cloudflare) that controls these headers. For higher security, replace insecure=true with a specific list of trusted IPs:
- "--entrypoints.web.forwardedHeaders.trustedIPs=173.245.48.0/20,103.21.244.0/22"
(Use the full Cloudflare IP range for production.)
k3s watches the manifests directory and applies HelmChartConfig changes automatically. Force a Traefik restart to apply the change immediately:
kubectl rollout restart -n kube-system deploy/traefik
kubectl rollout status -n kube-system deploy/traefik
Verify the fix
Re-run the diagnostic curl. The output should now show the header preserved:
X-Forwarded-Proto: https       ← preserved
HTTPS variable: on             ← snippet activated
is_ssl(): TRUE                 ← WordPress recognizes HTTPS
siteurl: https://example.com   ← consistent
Remove the test file:
kubectl exec deploy/wordpress -- rm /var/www/html/_test.php
Test https://example.com/wp-admin in an incognito window. The login page should load without redirect loops.
If a regular (non-incognito) browser still loops, clear the HSTS cache for the domain. For Chrome and Edge, navigate to chrome://net-internals/#hsts, locate the “Delete domain security policies” section, enter the domain name, and click Delete. Then clear cookies and cached files for the domain.
Step 7: Install and configure Redis Object Cache
WordPress does not use Redis by default — even with a Redis pod running and reachable, WordPress needs a plugin to actually use it for caching. The standard plugin for this is Redis Object Cache by Till Krüss, with over a million active installations.
Install the plugin
- In WordPress admin, navigate to Plugins → Add New Plugin.
- Search for
Redis Object Cache. - Locate the plugin by Till Krüss and click Install Now.
- Click Activate.
After activation, a new menu item appears: Settings → Redis.
Configure connection details
Open the Redis settings page. The default state shows:
Status: Not Enabled
Host: 127.0.0.1
Port: 6379
The host is wrong — it should be redis (the Kubernetes service name), not 127.0.0.1 (localhost). Clicking “Enable Object Cache” at this point produces:
Redis is unreachable: Connection refused [tcp://127.0.0.1:6379]
This is expected. The plugin reads its configuration from constants defined in wp-config.php, and those constants haven’t been set yet. The deployment YAML included WORDPRESS_CONFIG_EXTRA with Redis settings, but the official WordPress Docker image only writes that variable to wp-config.php on first install — if the file already exists on the persistent volume, the entrypoint script skips that step.
The fix is to add the Redis defines directly to wp-config.php.
Add Redis configuration to wp-config.php
kubectl exec -it deploy/wordpress -- bash
cd /var/www/html

# Backup
cp wp-config.php wp-config.php.bak-redis-$(date +%s)

# Insert Redis configuration before wp-settings load
sed -i "/require_once ABSPATH . 'wp-settings.php';/i\\
\\
/* Redis Object Cache configuration */\\
define('WP_REDIS_HOST', 'redis');\\
define('WP_REDIS_PORT', 6379);\\
define('WP_REDIS_TIMEOUT', 1);\\
define('WP_REDIS_READ_TIMEOUT', 1);\\
define('WP_REDIS_DATABASE', 0);\\
\\
" wp-config.php

# Verify position
grep -n "WP_REDIS\|wp-settings" wp-config.php

# Verify syntax
php -l wp-config.php

exit
The output should confirm the defines are positioned before wp-settings.php loads:
132:define('WP_REDIS_HOST', 'redis');
133:define('WP_REDIS_PORT', 6379);
134:define('WP_REDIS_TIMEOUT', 1);
135:define('WP_REDIS_READ_TIMEOUT', 1);
136:define('WP_REDIS_DATABASE', 0);
139:require_once ABSPATH . 'wp-settings.php';

No syntax errors detected in wp-config.php
The critical insight: WP_REDIS_HOST is set to 'redis', the Kubernetes service name. Inside the cluster, CoreDNS resolves redis to the current Redis pod IP automatically. If the Redis pod restarts and receives a new IP, WordPress connections remain unaffected — the DNS abstraction handles it.
Restart WordPress and enable the cache
kubectl rollout restart deploy/wordpress
kubectl rollout status deploy/wordpress
Return to WordPress admin → Settings → Redis. The page should now show:
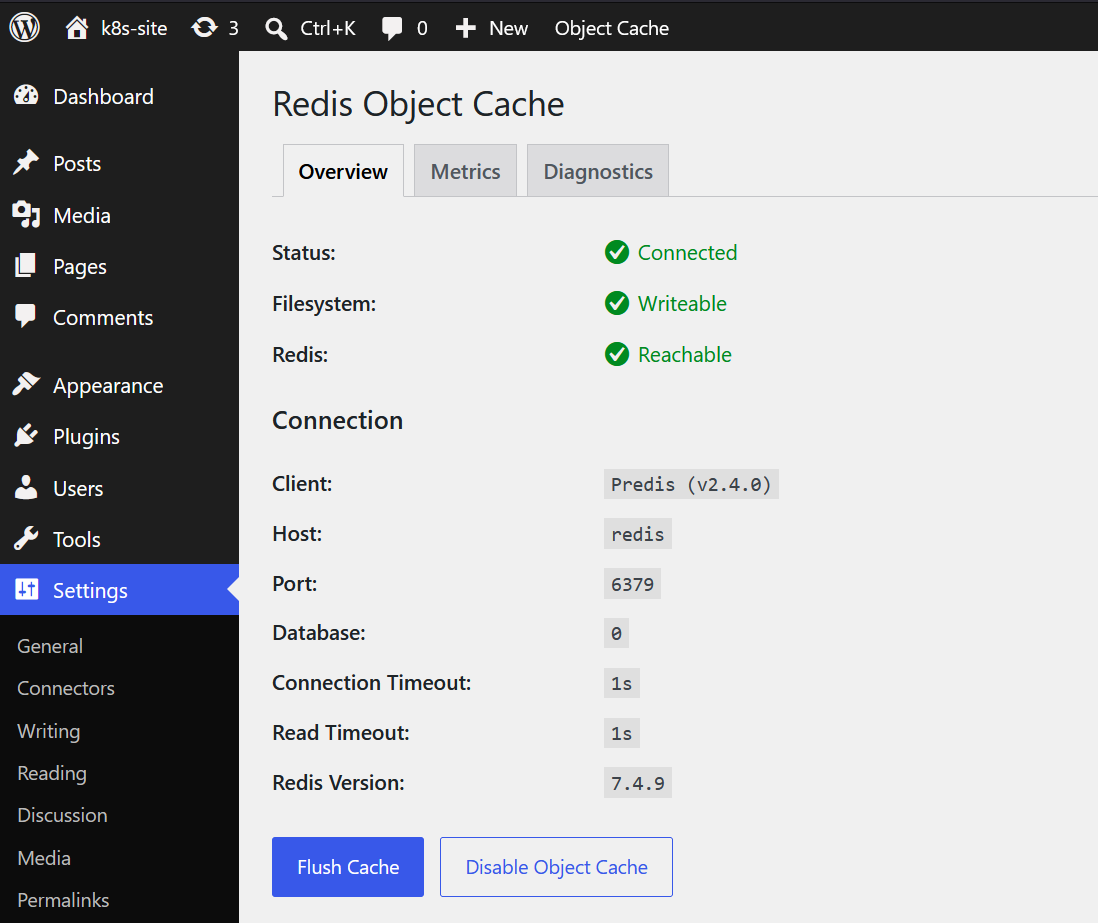
Status: ✅ Connected
Client: PhpRedis
Host: redis
Port: 6379
Click Enable Object Cache. WordPress will start writing cache data to Redis immediately.
Step 8: Verify Redis caching is active
A green “Connected” indicator is one form of proof, but verifying that WordPress is actually using Redis for cache hits — and that performance improves measurably — requires a few diagnostic commands.
Count cache entries
kubectl exec deploy/redis -- redis-cli DBSIZE
Output:
(integer) 247
This is the number of cached items WordPress has stored. Before plugin activation, this value was 0 or close to it.
Inspect cache keys
kubectl exec deploy/redis -- redis-cli --scan --pattern 'wp:*' | head -20
The output shows WordPress’s actual cached data structures:
wp:options:alloptions
wp:options:notoptions
wp:posts:last_changed
wp:terms:last_changed
wp:users:1
wp:posts:1
wp:transient:doing_cron
wp:user_meta:1
wp:site-options:siteurl
wp:plugins:active_plugins
Each of these would otherwise be a database query. Cached, they’re served from memory in microseconds.
Watch live cache activity
In one terminal:
kubectl exec -it deploy/redis -- redis-cli MONITOR
In a browser, refresh the WordPress homepage. The MONITOR output streams every Redis command as it happens:
1718965432.123 [0 10.42.0.5:42312] "GET" "wp:options:alloptions"
1718965432.124 [0 10.42.0.5:42312] "GET" "wp:posts:last_changed"
1718965432.125 [0 10.42.0.5:42312] "GET" "wp:posts:1"
1718965432.127 [0 10.42.0.5:42312] "SET" "wp:posts:meta:1" "..."
This is real-time evidence of WordPress actively reading from and writing to Redis. Press Ctrl+C to exit MONITOR.
Calculate the cache hit rate
kubectl exec deploy/redis -- redis-cli INFO stats | grep -E "keyspace_hits|keyspace_misses"
Output:
keyspace_hits:15234
keyspace_misses:1289
Calculation: 15234 / (15234 + 1289) = ~92% hit rate. Out of every 100 cache lookups, 92 are served from Redis in microseconds. Only 8 fall back to MySQL.
Check memory usage
kubectl exec deploy/redis -- redis-cli INFO memory | grep -E "used_memory_human|maxmemory_human|maxmemory_policy"
Output:
used_memory_human:4.21M
maxmemory_human:256.00M
maxmemory_policy:allkeys-lru
Redis is consuming about 4MB of its 256MB ceiling, with LRU (Least Recently Used) eviction configured. When memory fills, old entries are evicted first — the correct behavior for a cache.
Measure the performance improvement
With Redis caching enabled, time five sequential requests:
for i in 1 2 3 4 5; do
  curl -o /dev/null -s -w "Request $i: %{time_total}s\n" \
    -H "Host: example.com" http://localhost/
done
Typical output:
Request 1: 0.412s    ← first request, populates cache
Request 2: 0.089s
Request 3: 0.087s
Request 4: 0.091s
Request 5: 0.085s
Disable the cache temporarily (Settings → Redis → Disable Object Cache) and run the same loop:
Request 1: 0.485s
Request 2: 0.420s
Request 3: 0.398s
Request 4: 0.411s
Request 5: 0.405s
The difference is approximately 75% reduction in average page load time. With cache enabled, the database is consulted only for cache misses; with cache disabled, every page load runs the full set of MySQL queries.
Re-enable the cache after testing.
Troubleshooting playbook
Real deployments encounter unexpected issues. This section is a structured approach to diagnosing problems at each layer of the stack.
Five commands that solve most problems
# 1. Is everything running?
kubectl get pods

# 2. If a pod isn't healthy, why?
kubectl describe pod <pod-name>

# 3. What is the application reporting?
kubectl logs deploy/<name> --tail=50

# 4. What did the application report before crashing?
kubectl logs deploy/<name> --previous --tail=50

# 5. Investigate from inside the container
kubectl exec -it deploy/<name> -- bash
Pod status reference
| Status | Meaning | First action |
|---|---|---|
| Running 1/1 | Healthy and passing probes | Continue diagnosis at the next layer |
| Running 0/1 | Container is up but failing readiness/liveness probes | Check logs and probe configuration |
| Pending | Cannot be scheduled (resources, PVC, etc.) | kubectl describe pod |
| ContainerCreating | Pulling image or attaching volumes | Wait, then describe if it persists |
| CrashLoopBackOff | Container starts then dies repeatedly | logs –previous |
| OOMKilled | Out of memory | Increase memory limits in deployment |
| ImagePullBackOff | Cannot pull container image | Check image name and registry credentials |
| Error | Container exited with non-zero status | Check logs |
Diagnosing WordPress
# Pod status
kubectl get pods -l app=wordpress

# Recent logs
kubectl logs deploy/wordpress --tail=50

# Test from inside the pod
kubectl exec deploy/wordpress -- curl -I http://localhost

# Verify DNS resolution for dependencies
kubectl exec deploy/wordpress -- getent hosts mysql
kubectl exec deploy/wordpress -- getent hosts redis

# Verify Redis configuration is in wp-config.php
kubectl exec deploy/wordpress -- grep "WP_REDIS" /var/www/html/wp-config.php

# Verify HTTPS detection snippet is in place
kubectl exec deploy/wordpress -- grep "X_FORWARDED" /var/www/html/wp-config.php
Diagnosing MySQL
# Pod status
kubectl get pods -l app=mysql

# Recent logs
kubectl logs deploy/mysql --tail=30

# Test MySQL responsiveness
kubectl exec deploy/mysql -- mysqladmin ping

# Test connection from WordPress
kubectl exec deploy/wordpress -- bash -c \
  "echo 'SELECT 1' | mysql -h mysql -u wpuser -p\$WORDPRESS_DB_PASSWORD wordpress"

# Check WordPress users (verify DB is intact)
kubectl exec -it deploy/mysql -- mysql -u wpuser -p wordpress -e \
  "SELECT ID, user_login, user_email FROM wp_users;"
Diagnosing Redis
# Pod status
kubectl get pods -l app=redis

# Test responsiveness
kubectl exec deploy/redis -- redis-cli ping
# Expected output: PONG

# Check connectivity from WordPress
kubectl exec deploy/wordpress -- getent hosts redis

# View Redis logs
kubectl logs deploy/redis --tail=20
Diagnosing services
A service with no endpoints causes 503 errors at the ingress:
# List services
kubectl get svc

# Show what pods a service is actually pointing to
kubectl get endpoints

# Detailed service info
kubectl describe svc wordpress

# Compare service selector to pod labels
kubectl get pods --show-labels
If kubectl get endpoints wordpress shows <none>, the service’s selector does not match any pod’s labels. Compare the service’s selector field to the pod’s labels — they must match exactly.
Diagnosing ingress routing
# Verify ingress registration
kubectl get ingress
kubectl describe ingress wordpress-ingress

# Test ingress directly with Host header
curl -I -H "Host: example.com" http://<node-ip>

# Check Traefik logs
kubectl logs -n kube-system -l app.kubernetes.io/name=traefik --tail=30
Cluster-wide event monitoring
# Recent events sorted by time
kubectl get events --sort-by='.lastTimestamp'

# Events in a namespace
kubectl get events -n wordpress --sort-by='.lastTimestamp'

# Watch events live
kubectl get events --watch

# Only warnings (filter noise)
kubectl get events --field-selector type=Warning
Quick health overview script
When something major fails and the cause isn’t immediately clear:
echo "=== Pods (showing only non-Running) ==="
kubectl get pods -A | grep -v Running | grep -v Completed

echo "=== Recent warnings ==="
kubectl get events -A --field-selector type=Warning --sort-by='.lastTimestamp' | tail -20

echo "=== Node status ==="
kubectl get nodes
kubectl top nodes 2>/dev/null

echo "=== PVCs (showing only non-Bound) ==="
kubectl get pvc -A | grep -v Bound

echo "=== Ingresses ==="
kubectl get ingress -A
Save this as ~/k8s-health.sh and run it whenever the cluster needs a quick overview.
Credentials and password recovery
Two distinct sets of credentials govern the deployment, and they’re stored differently. Knowing how to recover each one prevents lockouts.
MySQL credentials (in Kubernetes secret)
MySQL passwords are stored in a Kubernetes secret named mysql-secret. Values are base64-encoded but not encrypted, and can be decoded directly:
# Retrieve a single value
kubectl get secret mysql-secret -o jsonpath='{.data.mysql-password}' | base64 -d && echo

# Retrieve all values
echo "Root password: $(kubectl get secret mysql-secret -o jsonpath='{.data.mysql-root-password}' | base64 -d)"
echo "User: $(kubectl get secret mysql-secret -o jsonpath='{.data.mysql-user}' | base64 -d)"
echo "User password: $(kubectl get secret mysql-secret -o jsonpath='{.data.mysql-password}' | base64 -d)"
echo "Database: $(kubectl get secret mysql-secret -o jsonpath='{.data.mysql-database}' | base64 -d)"
Important: Kubernetes secrets are not encrypted by default — they’re base64-encoded, which is effectively plaintext. Do not commit them to version control. For stronger protection, consider tools like SealedSecrets, External Secrets Operator, or HashiCorp Vault.
WordPress admin password (in MySQL)
The WordPress admin password is not in any Kubernetes secret. It lives inside MySQL itself, in the wp_users table. To reset:
# Get MySQL password from secret
kubectl get secret mysql-secret -o jsonpath='{.data.mysql-password}' | base64 -d && echo

# Connect to MySQL
kubectl exec -it deploy/mysql -- mysql -u wpuser -p wordpress
At the mysql> prompt:
-- List WordPress users to find the admin
SELECT ID, user_login, user_email FROM wp_users;

-- Reset password (using MD5 — WordPress will auto-upgrade on next login)
UPDATE wp_users SET user_pass = MD5('NewStrongPassword123!') WHERE ID = 1;

EXIT;
Replace 'NewStrongPassword123!' with a strong password. After logging in, navigate to Users → Profile and set a properly hashed password through the WordPress UI.
Reset via WP-CLI (alternative method)
kubectl exec -it deploy/wordpress -- bash
cd /var/www/html

# Install WP-CLI if not already present
curl -O https://raw.githubusercontent.com/wp-cli/builds/gh-pages/phar/wp-cli.phar
chmod +x wp-cli.phar

# List users
./wp-cli.phar user list --allow-root

# Reset password
./wp-cli.phar user update 1 --user_pass='NewStrongPassword123!' --allow-root

exit
Safety practice: backup wp-config.php before editing
Any direct edit to wp-config.php risks breaking the file and rendering the site inaccessible. Always backup first:
kubectl exec deploy/wordpress -- cp \
  /var/www/html/wp-config.php \
  /var/www/html/wp-config.php.bak-$(date +%s)
Timestamped backups allow multiple safety copies. To restore:
kubectl exec -it deploy/wordpress -- bash
cd /var/www/html
ls -lt wp-config.php.bak-*    # newest backup first
cp wp-config.php.bak-XXXXXXXXXX wp-config.php
php -l wp-config.php          # verify syntax
exit
kubectl rollout restart deploy/wordpress
Frequently asked questions
Why use Cloudflare Flexible SSL instead of Full?
Flexible SSL is the simplest configuration when starting out — it requires no certificate management on the origin server. Visitors see HTTPS with Cloudflare’s certificate; the connection between Cloudflare and the origin remains HTTP. For production deployments handling sensitive data, the recommended progression is to add a certificate to the cluster (via cert-manager + Let’s Encrypt) and switch Cloudflare to Full (strict) mode for end-to-end encryption.
Why does the homepage work but wp-admin produces a redirect loop?
WordPress treats the admin area differently from public pages. The function force_ssl_admin() actively redirects HTTP requests to HTTPS when the configured site URL uses HTTPS. Public pages render whatever they receive without enforcing the protocol. Without the X-Forwarded-Proto trust snippet, WordPress doesn’t know the original request was HTTPS, sees mismatched protocols, and redirects — creating the loop.
Is “Always Use HTTPS” in Cloudflare causing the redirect loop?
It’s a contributing factor, not the cause. The fundamental issue is WordPress not recognizing the request as HTTPS. “Always Use HTTPS” ensures the visitor’s request is upgraded; the wp-config snippet (Step 5) and Traefik forwarded headers configuration (Step 6) ensure WordPress knows the upgrade happened.
How can multiple WordPress sites be hosted on the same cluster?
Each site gets its own namespace, deployment set (MySQL, Redis, WordPress), and ingress with its own domain. Traefik routes by Host header — all sites share port 80, no port conflicts. The pattern is: create namespace wordpress2, deploy the same manifests with the namespace updated, create an ingress for the new domain, and add a Cloudflare DNS record pointing to the same origin IP.
Can applications in different namespaces communicate?
Yes. Use the fully-qualified service DNS name: service-name.namespace.svc.cluster.local, or the shorter form service-name.namespace. Communication stays entirely inside the cluster — fast, secure, and not subject to public DNS or proxy overhead.
What happens to data when a pod restarts or crashes?
Data lives on PersistentVolumeClaims, not inside pods. When a pod is destroyed and recreated, the new pod attaches to the same PVC and resumes with the same data. This can be verified directly:
kubectl delete pod -l app=wordpress
kubectl get pods -w
# A new pod is created within seconds, with all WordPress data intact
Is Redis Object Cache safe for production use?
Yes. The plugin is stable and used on millions of WordPress sites. The one consideration: if Redis becomes unavailable, WordPress falls back to using MySQL for everything, which works but is slower. For deployments where cache availability is critical, Redis Sentinel or Redis Cluster provides high availability — but for most single-node deployments, the configuration in this guide with AOF persistence is sufficient.
How do you clear a cached redirect loop in the browser?
Browsers cache 301 redirects and HSTS policies aggressively, which means the loop can persist in the browser even after the server is fixed. Two solutions:
- Test fixes in an incognito or private window, which bypasses cache.
- For persistent issues in Chrome or Edge, navigate to
chrome://net-internals/#hsts, locate “Delete domain security policies”, enter the domain, and click Delete. Then clear cookies and cached files for the domain (Ctrl+Shift+Del).
What’s the next step after this deployment?
Several improvements are worth considering: moving Cloudflare to Full (strict) SSL with cert-manager handling Let’s Encrypt certificates at the cluster level; adding a CronJob for automated MySQL backups to S3-compatible storage; configuring Cloudflare caching rules to serve static assets from the edge; and adding monitoring (Prometheus + Grafana, or a managed solution) for production visibility.
Conclusion
This post took the k3s WordPress deployment from internal-only to publicly accessible at a real domain with HTTPS, then enabled and verified Redis Object Cache for measurable performance gains. The completed setup includes:
- A real domain (
example.com) routed through Cloudflare with free SSL at the edge - Cloudflare proxy concealing the origin IP from public DNS
- Traefik handling hostname-based routing inside the cluster
- WordPress correctly identifying HTTPS through the X-Forwarded-Proto chain
- Traefik configured to trust upstream forwarded headers
- Redis Object Cache active with a 90%+ hit rate
- ~75% reduction in page load times
- A structured debugging approach for every layer of the stack
The most important pattern from this deployment: verify each layer before moving to the next. When multiple proxies are involved, headers can be silently rewritten at any hop. A short diagnostic script that dumps $_SERVER values reveals exactly what the application receives, eliminating guesswork.
Recommended next steps
- Move to Full (strict) SSL: install cert-manager and configure Let’s Encrypt for cluster-level certificates, then switch Cloudflare to Full (strict) for end-to-end encryption.
- Automate backups: create a CronJob that runs
mysqldumpnightly and pushes archives to object storage. - Configure Cloudflare caching rules: serve static assets from the edge to dramatically reduce origin load.
- Add monitoring: deploy Prometheus and Grafana, or use a managed observability solution, for visibility into pod health and performance metrics.
- Scale to multiple sites: use the same patterns to host additional WordPress installations in separate namespaces, all behind the same Traefik instance.
These patterns scale from single-node home labs to production multi-node clusters. The Kubernetes objects, manifests, and debugging techniques are the same — only the underlying infrastructure changes.
If this guide was useful, consider sharing it. Questions and feedback are welcome in the comments below.
Be the first to comment